You see since I stopped using the Amiga regularly (this sounds like a meeting of Amiga Anonymous, of which I'm sure there'd be many many members ;p).. I've "looked after" the disks by storing them in some large wooden crates, I've got 6 of these crates, each holding around 500 disks, plus a couple of large shoe boxes, and an old 80 capacity smoked plastic lid box, each crammed as full as can be.. all in all there's somewhere around 5000 disks.. That's rather a lot to go through.. especially when you didn't label many of them appropriately..
Around 3 years ago, I tried reading the disks manually.. I made it through a hundred or so, before I realised my brain had gone numb, and I was at risk of chewing my tongue off and needing replacement eyeballs. In short, it was one of those tedious repetitive tasks that everyone really enjoys ;p
10 Insert disk, run capture program
20 Wait a couple of minutes
30 Eject disk
40 Insert new disk, run capture program
50 Rename last captured disk
60 Goto 20
Ideally line 60 would read
60 If bDisksRemaining Goto 20 Else Print "All Done!"
But that would just be hopelessly optimistic, given the quantity of disks to get through.
So roll forward to 2 years ago, when I rediscovered the Lego Mindstorms kit I had sitting in a cupboard (probably couldn't find it due to all the floppy disks). I had an idea that if I could get it to do the Insert/Eject part, that pretty much I could deal with the rest 'later'.. and that the entire process could be automated.
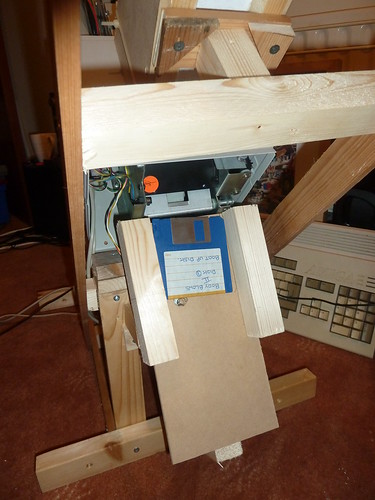
Cue the fantastic Lego Mindstorms Floppy Autoloader..


Building this was an entertaining challenge, as Mindstorms has a few things working against it for designing a Floppy Autoloader..
- Lego only supports fixed divisions of it's dimensions, which are not aligned with 3.5" media.
- The Mindstorms kit has only 3 motors (ok, 2, but I found a spare)
- The Mindstorms kit has 2 push sensors, and 1 light/color sensor.
- The RCX is fairly dim.
The motors & sensors let to the odd design above, rather than trying to create a set of lego 'fingers' to insert, and eject & extract the disk, the drive rotates, allowing just one linear motion to insert the disk, cause eject, and extraction for free via gravity.
Did it work? yes. Was it reliable enough to use? Not really, the tolerances for accidentally getting 2 disks from the stack instead of one, were a little fine, and the Lego would drift over time.. after just a few disks, it would generally mess up. I'd make better progress manually.
So I put the whole thing in a cupboard.. figuring I'd revisit it another day..
 And then I saw one of these on ebay.. It's a commerical disk duplicator.. with one of these, I could take each of my 5000 disks, and copy it onto a million more disks, until I could take over the world!!!
So I bought it.. and I won't revisit the surgery I performed on it here, as that's well covered in this post and this post, and the more recent update here.
In summary, I ripped out the controller, replaced it with an arduino, a motor controller, and a kryoflux Mounted the entire thing on a custom stand to improve the eject chances with badly labelled disks, added an expanded capacity input chute, repurposed the solenoid from inside to act as a disk stop in the eject chute, wrote some code to control the whole thing, and added a camera to photograph the disk as it exited.
 This last part finally meant I could just load it up with disks and leave it to it. It will hold around 80 disks a time in the hopper, and each one is fed into the drive, ripped to stream & adf format by the kryoflux, then ejected. As it pops out, the solenoid blocks it from going too far, the camera takes its picture and then the solenoid fires letting the disk fall to the ground. Check out a few more pictures of the oddball woodwork & the unit here.
So far in over 300 disks, it has had 1 disk cause a blockage (am I glad I carefully wrote the code to check that!!) which was due to a badly torn and peeling label. We'll ignore the 20 or so disks I had to redo after I turned out the light in the room where it was running & thus had nice black images instead of disk photos.
It takes around 3 to 4 minutes per disk, so I've got a few weekends ahead of me with it running as much as possible.. meanwhile, I need to write some software to let me browse & catalogue all this data!
You should also make a backup (on dropbox or so) ;)
ReplyDeleteThe archived data comes to over 50gb.. I think I'll keep it local at least till I can trim that down by losing the raw data where the adf is good.
ReplyDelete"The archived data comes to over 50gb."
DeleteIt's funny, normally that would be nothing. But after watching a 6 minute video full of floppy disks, that number made me say 'Geez...' and shake my head in dismay.
How come you get 50gb from 5000 disks ? aren't they about 1.5Mb capacity ? this would make 7.5Gb
DeleteBecause I'm not storing just the data from the disks, but also storing the Raw MFM flux timing information, with potentially multiple revolutions per track. Storing the timing info means that even if it's copy protected, or an oddball format (eg amiga/st) I can basically emulate having that disk in a drive, and read back signals just as if it were real. The downside is it increases the storage requirements somewhat.. Checkout Kryoflux for more info, its the unit I'm using the handle the disk imaging.
DeleteDepending on the resolution of the picture, the photo of the floppy might be bigger than the disk image ;-)
DeleteI would be more than happy to host it for you online with some search engine on top of that... The only problem is the bandwidth, but I'm fairly sure I can queue the outbound traffic for anyone who wishes to access it. Am a PHPDev with rather big home server so 50GB is not a problem...
Deletecontact me if you're interested?
http://dinxproject.com/contact/
That is a sweet build and a good job on archiving old data. Hope you can make some of it available.
ReplyDeleteI hope to at least post a romcenter data for the content I found that's not known to the Amiga Tosec at the mo. I have coverdisks not listed at the mo, and many many disks of old 8bit sound samples (ST-00 etc)
ReplyDeleteFantastic idea... i sure could use one of these to copy and data save my almost 600 floppies of amiga games...
ReplyDeleteThank you for sharing...
Emanuel from Greece...
Nice! I have a few hundred Amiga floppies I'd like to turn into ADFs. Sadly, the UPCHUG disk library has disappeared into a members home, never to be seen again.
ReplyDeleteI love how you have all the great build to handle the disks, then... it just spits them out into a great pile!
ReplyDeleteWould not it be faster if you used more drives ? :)
ReplyDeleteBut then.. I would need more autoloader mechanisms.. provided it gets the job done, without me.. I'm not too worried =)
DeleteGood God if you're doing this for a company you need to quit, and if you're doing this for kicks shoot yourself.
ReplyDeleteNifty gadget, good job.
*shoots self*
DeleteAnd I thought some of our (ICPSR) tape drives and punched card reader were making the most of old school technology....
ReplyDeleteNicely done!
Have you considered either rentign tht device out or settign up a conversion service?
ReplyDeleteWould you be willing to share this code I am apart of a community that preserves old videogame history. I've been manually doing this for a long time and I'd love to build one my self. Would you share the code you've written for the Arudino? Thanks,
ReplyDeleteThe arduino code is pretty much just acting as a USB Serial controlled state machine that coordinates the guts of the autoloader.. Eg, when it starts up, I send it 'z' which tells it to try to figure out where the slider is (see previous posts for more on this).. then I can send it 'q' to query the current sensor states, 'i' to insert a disk, which carries out a timed activation of the motor, ending when the sensors say the disk has been inserted, or if a small amount of time has passed.. 'e' for eject does the opposite, powering the motor in reverse, checking sensors, giving up after a max time elapsed.. and finally 's' will fire the solenoid for a very short period. None of the code is particularly complex, or very useful, unless you've got another CopyPro unit you are working with? If so, i'll clean it up and pastebin it.. you'll likely need to tweak the timings the ones I settled on work with my unit, at the angle I mounted it at, with the floppy drive I used.. if only CopyPro had included a few more sensors, then a lot of the timing guesswork could be eliminated, but once you get the values in the right ballpark, it's pretty simple.
DeleteOne tip if you are trying to build this; really really make sure that you've got the code that handles a blockage tested, and functional.. the force that drives the disk home _Will_ tear a drive apart if you try to put a disk in a drive with one already inside it.. The disks don't like that very much either ;p
The netbook is running a small java prog, using rxtx to talk to the arduino over usb serial, and issuing the cmdline invocations to cause the disk to be read by the kryoflux, and to cause the camera to take the photo.
What are you doing with the leftover floppy disks? I make boxes out of them which everyone loves but I ran out of floppies long ago.
ReplyDeleteOnce I've removed & (wiped|destroyed) those with personal data on.. the rest I'll offer around via amiga community boards / irc to anyone willing to collect ;p .. if no takers, then I'll do my best to avoid sending em to landfill.. but really.. 6 crates is a tad heavy to post anywhere..
DeleteCould you please give me the song's title and artist? I love it!
ReplyDeleteI'm the artist.. and it doesn't really have a title.. it's an improvisation based on the Doctor Who themetune.
DeleteIncreible, 5000 discos del amiga, de seguro que tiene mucha informacion valiosa, "is a fantastic work"
ReplyDeleteHeh. I've done the same thing... with Lego NXT, Android and python... https://retracile.net/blog/2011/01/13/23.30 . I now have an improved version that photographs the *back* side of the label; I have a number of them with the labels that wrap around. I also have it able to create an ISO with a visual index using the perspective-corrected and cropped pictures, .zip of the contents, the raw data read from the floppy, and a browsable tree of the contents. Oh, and it has lights built in so turning off the room light isn't a problem. ;) I'm using a standard USB floppy, so I don't get the flux data you're storing though. I'm hoping to offer it as a service, if I can work out the details.
ReplyDeleteVery nicely done there =)
DeleteInteresting we both went with rotating the drive to get the disk out, but you've used a single linear action to remove the disk from the base of the stack, and deliver it all the way into the drive.
Mine used a big soft wheel at the base of the stack to pull the disk forward into a pair of grab wheels tensioned together by rubber bands, which then continued to push the disk almost home. Then finally a very highly geared linear motion 'prodder' would drive the disk all the way home. The prodder was aligned with the eject button, so once ready to remove the drive would rotate just a little to allow the same thing that pushed the disk home, to push the eject button. Finally the drive would rotate to 90' downward, for the eject.
You could easily swap the usb floppy for a "real" floppy, attached via a kryoflux, then you could handle disks other than dos format =)
Pls I am from Brazil, I am curator of Museu do computador, and I would like to get the schematics, etc how does that machine. Please.
ReplyDeleteJose carlos Valle - curator
www.museudocomputador.com.br
This is excellent. I love this kind of engineering :)
ReplyDeleteAmazing thing!
ReplyDeleteBut... you still will have to look over those floppy images to find useful stuff;)
Brilliant! Would work wonders for the Atari ST users out there too.
ReplyDeletelastima no poder compartir toda esa info, sobre todo el esquema medidas etc aunque esta todo mas que explicado...buen trabajo, pero por favor espero tomes medidas de seguridad para que un desafortunado "accidente" en el HD no de al traste con tantas horas dedicadas, repito,Buen trabajo si señor
ReplyDeleteAmazing job on your Blog! I'll definatly be coming back. If you're interested...hard drive duplicator
ReplyDeleteInteresting, although the floppy-to-usb webpage discusses support for non-dos formats, it doesn't elaborate as to how it would cope with the wildly varying formats used commonly for copy protection in 16 bit era micro's like the Amiga. Especially when reading data that has been on the disks for nearly 30 years..
ReplyDeleteIf (and that's a rather large IF) it's able to record the disk at that level, it would be a device similar to the kryoflux I used, (which also basically goes from a floppy drive to a usb-port) except the kryoflux has a lot more documentation describing the various formats they can read, and has a focus more on data preservation than device replacement. That said, once the images are created via the kryoflux there are quite a few sdcard/usb based floppy emulators out there you can already attach to a floppy port, with custom format & timing support extensively documented.
Great project. I´m trying to read a floppy disc with an arduino and use it to feed a graphical generative output(using processing). Up to now could not solve the problem of having different data sequences from the same disk, even using the index as a reference signal. Any idea on how to get the initial reading of each disk to be always the same? Is it possible to do?
ReplyDeleteUsing an arduino to read the data is very tricky.. I'm only using the arduino here as a motor controller to manage the autoloader, the data itself is being read by the kryoflux.
DeleteThat said, I got pretty far with an arduino and did manage to pull data sequences that matched, the main issue being that a single track can have ~560000 pulse transitions to record, which vastly exceeds the ram on an arduino.
The other issue is speed, you have less than 4us to process a transition before you must be ready to process the next one, which doesn't leave you many arduino instructions to play with.
I tried moving to a maple/olimexino-stm32 which ran at 72mhz, and had 16k of ram, and dma from timer capture gpio to spi, and finally when combining that with external spi fram, I could read entire tracks reliably as containing the same data. (Although be aware the index pulse still wanders by a few us when compared to the track data..)
I suspect that an arduino might 'just' be able to sample the data reliably and push it to spi.. but I haven't verified that. And if I were to rebuild, I'd try hooking the arduino spi to a raspberry pi, as the 512mb of ram, would make storing & processing disk images easier (sadly I couldn't find a way to do timer capture on pi gpio).
If you hunt on google for arduino floppy pastebin, you'll find the code as I left it, (edit: http://pastebin.com/7X3RtgYi) it's not too tricky to remove the lcd output stuff I had in there, and you'll need to then alter the main timedata loop to not store into an array, but to send via spi to something to record the bytes.. from there on it'll be a matter of balancing the no of instructions spent in the main loop vs how long your spi sends take. The arduino can do timer capture/pin interrupt driven methods, but I found the overhead to get into & out of the methods was higher than I would like, and ended up just spinning polling the pin every loop.
Yeah reading a floppy is just a bit too hardcore for an Atmega; you're short on cycles, ram and a way to get the data off-chip fast enough; kryoflux uses an ARM cpu with 64k RAM and USB, which I figured would be juuuust about right. The long story was http://eab.abime.net/showthread.php?t=40959&styleid=1
DeleteWow. I can just imagine what could be done in late 2015, with 3d printers and a wide variety of arduinos and raspberry pi's.
ReplyDeleteWhat happened to the project and the archive?
This comment has been removed by the author.
ReplyDeleteThis comment has been removed by the author.
ReplyDelete